Interested in learning how to program quantum computers? Then check out our Qiskit textbook Introduction to Quantum Computing with Qiskit.
This tutorial will show you how to create a Random Number Generator in qiskit for IBMs quantum computers.
Implementation
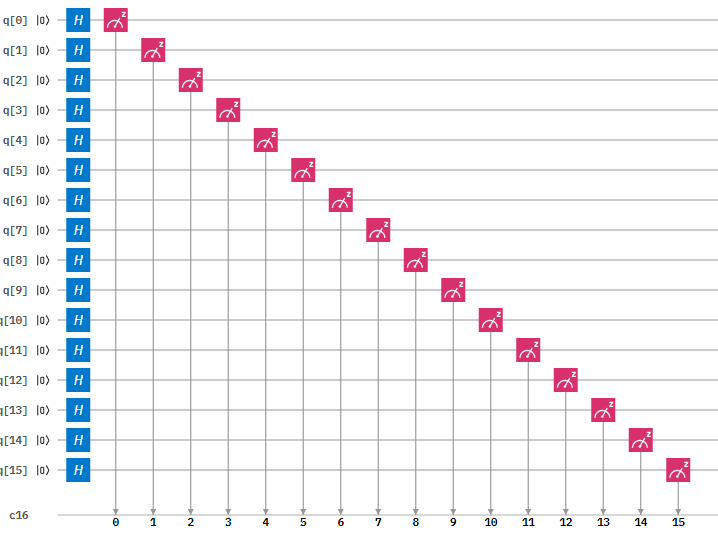
Figure 1: Circuit Diagram of the 16-qubit Random Number Generator
Step 1: Initialise the quantum and classical registers
The first step is to initialise a 16 qubit register . This is done by the following code:
q = QuantumRegister(16,'q')
Next we initialise the 16 bit classical register with the following code:
c = ClassicalRegister(16,'c')
Step 2: Create the circuit
Next we create quantum circuit using the following code:
circuit = QuantumCircuit(q,c)
Step 3: Apply a Hadamard gate to all qubits
Then we need to apply a Hadamard gate. This gate is used to put a qubit in to a superposition of 1 and 0 such that when we measure the qubit it will be 1 or a 0 with equal probability.
This is done with the following code:
circuit.h(q)
Step 4: Measure the qubits
After this we measure the qubits. This measurement will collapse the qubits superposition in to either a 1 or a 0.
This is done with the following code:
circuit.measure(q,c)
How to run the program
Copy and paste the code below in to a python file
Enter your API token in the IBMQ.enable_account('Insert API token here') part
Save and run
Code
from qiskit import QuantumRegister, ClassicalRegister, QuantumCircuit, execute,IBMQ
from qiskit.tools.monitor import job_monitor

IBMQ.enable_account('ENTER API TOKEN HERE')
provider = IBMQ.get_provider(hub='ibm-q')

q = QuantumRegister(16,'q')
c = ClassicalRegister(16,'c')
circuit = QuantumCircuit(q,c)
circuit.h(q) # Applies hadamard gate to all qubits
circuit.measure(q,c) # Measures all qubits

backend = provider.get_backend('ibmq_qasm_simulator')
job = execute(circuit, backend, shots=1)

print('Executing Job...\n')
job_monitor(job)
counts = job.result().get_counts()

print('RESULT: ',counts,'\n')
print('Press any key to close')
input()
Output
Once you have ran the program you will get the following output:
