
Interested in learning how to program quantum computers? Then check out our Qiskit textbook Introduction to Quantum Computing with Qiskit.
Updated: 18/11/25
This tutorial will show you how to implement Grover’s Algorithm on IBMs Quantum Computers in Python with Qiskit.
What is Grover’s Algorithm?
Grover’s Algorithm is a quantum search algorithm that can search for a value or element in an unsorted set in O(√N) as opposed to classical search algorithms that at worse will find an element in O(N) time.
Note that this implementation is single iteration only. However the code is run with 100 shots to show the frequency of values measured.
The algorithm is divided in to the following steps:
Put all Qubits in to superposition using a Hadamard gate.
Implement an oracle that will mark the state you wish to find. This oracle works by performing a phase flip inverts the states amplitude.
Implement an amplification circuit that further increases the marked states amplitude while decreasing the amplitude of all other states
Measure all qubits
Implementation


STEP 1: INITIALISE THE QUANTUM AND CLASSICAL REGISTERS
The first step is to initialise a 4 qubit register . This is done by the following code:
Next we initialise the 4 bit classical register with the following code:
STEP 2: CREATE THE CIRCUIT
Next we create quantum circuit using the following code:
STEP 3: APPLY A HADAMARD GATE TO ALL QUBITS
Then we need to apply a Hadamard gate. This gate is used to put a qubit in to a superposition of 1 and 0 such that when we measure the qubit it will be 1 or a 0 with equal probability.
This is done with the following code:
STEP 4: Create the Oracle
Once all qubits are in superposition we can implement the oracle circuit. The oracle circuit inverts the amplitude of the state making it -1/4. This is done by first applying a Pauli X gate to certain qubits (depending on the state you wish to mark).
Then you apply a triple controlled Z gate to Qubit 3 with the following code:
After this you apply the Pauli X gate to the same qubits you applied the gates to before.
Example oracle code for 1100
Example: to implement an oracle that marks 1100 we do the following:
Apply Pauli X gate to Qubits 0 and 1
Apply a triple controlled Z gate to Qubit 3
Again apply Pauli X gate to Qubits 0 and 1
STEP 5: Create the Amplification circuit
Next we apply a amplification circuit. This raises the amplitude of the marked state while decreasing the amplitudes of all other states.
This is done with the following steps:
Apply a hadamard gate to all Qubits
Apply a Pauli X gate to all Qubits
Apply a triple controlled Z gate to Qubit 3
Apply a Pauli X gate to all Qubits
Apply a hadamard gate to all Qubits
This is done with the following code:
STEP 6: Measure the Qubits
The final step is to measure all the qubits using the following code:
Device used
This tutorial uses the Qiskit Aer simulator in order to run the circuit. Note that results from this simulator contain no errors unlike on real quantum devices which are prone to noise.
More information on Qiskit Aer can be found here: https://qiskit.github.io/qiskit-aer/tutorials/1_aersimulator.html
In order to use to a real quantum device follow the steps here: https://quantum.cloud.ibm.com/docs/en/guides/initialize-account
Note: This program requires that you have an API token. To get one sign up to IBM Q Experience and get your token here: https://quantum-computing.ibm.com/account
Code
Note: that the code contains all the oracles which are commented out except for the oracle that marks 0000. Just uncomment the oracle you want and run.
Output
Once you have ran the program you will get the following output:
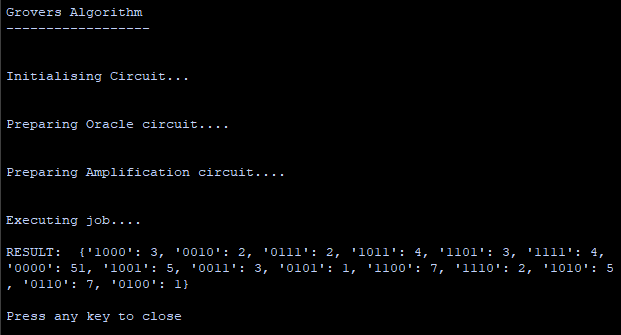
Figure 2: Output when marked value for oracle is 0000. Note how its count is considerably higher than the other values.