
Interested in learning how to program quantum computers? Then check out our Qiskit textbook Introduction to Quantum Computing with Qiskit.
Introduction
In this tutorial we will explore how to implement a controlled Hadamard gate on IBM’s quantum computers with Qiskit.
What is a Controlled Hadamard gate?
A controlled Hadamard gate is a controlled gate consisting of two qubits. When the control qubit is |1〉it will apply a Hadamard gate to the target qubit.
The matrix for the Controlled Hadamard gate is:

As with the other gates explained earlier we can multiply the column vector by the controlled Hadamard gates matrix. For our first example lets initialise both qubits to |0〉. For this the associated column vector will be:

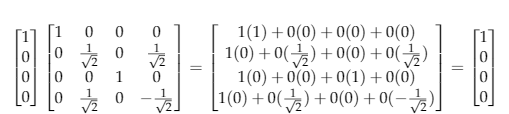
Which has left out state unchanged as the control qubit was |0〉. For our next example we will set the control qubit to |1〉and the target qubit to |0〉
The column vector will be:


This means that the Hadamard gate has put the system in to a superposition of |01〉and |11〉Like with the single qubit Hadamard gate the controlled described here is actually reversible and conforms to the identity HH=I meaning that if two controlled Hadamard gates are applied we will get back the previous state.
Let’s apply another controlled Hadamard gate by multiplying the resulting column vector with the controlled Hadamard gate matrix:


Which has returned the state back to |01〉.
Implementation
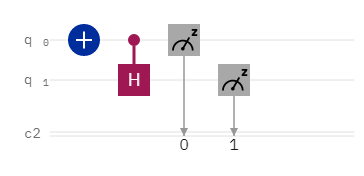
In Qiskit we can implement a Controlled Hadamard gate very easily by applying a Pauli X gate to the control qubit and then applying the Controlled Hadamard gate. Then we measure both qubits.
How to run the program
Copy and paste the code below in to a python file
Enter your API token in the IBMQ.enable_account('Insert API token here') part
Save and run
Code
from qiskit import QuantumRegister, ClassicalRegister
from qiskit import QuantumCircuit, execute,IBMQ
from qiskit.tools.monitor import job_monitor

IBMQ.enable_account('Enter API KEY HERE')
provider = IBMQ.get_provider(hub='ibm-q')

backend = provider.get_backend('ibmq_qasm_simulator')


q = QuantumRegister(2,'q')
c = ClassicalRegister(2,'c')

circuit = QuantumCircuit(q,c)

circuit.x(q[0])
circuit.ch(q[0], q[1]);
circuit.measure(q,c)

print(circuit)

job = execute(circuit, backend, shots=8192)

job_monitor(job)
counts = job.result().get_counts()

print(counts)
Output

Output showing the generated circuit and the results
This tutorial is an excerpt from our upcoming textbook Introduction to Quantum Computing with Qiskit.