
Interested in learning how to program quantum computers? Then check out our Qiskit textbook Introduction to Quantum Computing with Qiskit.
Introduction
In this tutorial we will explore the Quantum Fourier transform and how to implement it in Qiskit.
What is the Quantum Fourier Transform?
The Quantum Fourier Transform (QFT) is a circuit that transforms the state of the qubit from the computational basis to the Fourier basis. Note that the Fourier basis is just another term for the Hadamard basis. As such the easiest way to implement a QFT is with Hadamard gates and Controlled U1 gates.
Note: A Controlled U1 gate is just a gate that implements a single rotation around the Z-axis (phase) of the target qubit if the control qubit is 1.
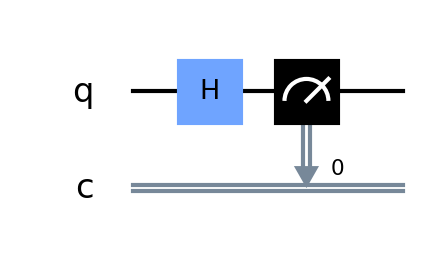
Circuit diagram of a 1 qubit QFT
For more information on phase and its relationship with Hadamard gates see our tutorial below:
https://quantumcomputinguk.org/tutorials/z-gate
The simplest QFT is a 1 qubit QFT which just implements a Hadamard gate.
However if we implement a 2 qubit QFT then you can see how the controlled U1 are used:

2 qubit QFT
First we implement a Hadamard gate which puts q0 in to superposition. Next we apply a controlled U1 gate with a rotation of pi/2 to q1. After this a Hadamard gate is applied to q1. Next we apply a swap gate to q0 and q1.
Note that these swap gates are not needed if the QFT is implemented at the end of your circuit.
After this both qubits will be in superposition but whatever computational value (1 or 0) will be encoded in to the Hadamard basis of the qubit.
To encode values on N qubits we have to double the rotation value of each qubit. For example the diagram below shows a 5 qubit QFT.
Notice how for q0 it applies a rotation of pi/2 for q1 then pi/4 for q2 then pi/8 for q3 and so on. This pattern repeats for each qubit. When all rotations have been applied to a qubit it is put in to superposition using a Hadamard gate. Then it can be used as a control qubit to apply rotations to target qubits below it.
Implementation

Circuit diagram of a 5 qubit QFT
Implementing a 5 qubit Quantum Fourier Transform in qiskit
In Qiskit we could implement the 5 qubit QFT by implementing all the gates in the diagram above.Thankfully Qiskit has a QFT function that we can use to make everything simpler!
In Qiskit you can use the QFTGate() function as follows:
Where:
num_qubits: The number of qubits we want to add to the QFT (in our case it is 5)
For example in our 5 qubit QFT we implement the following:
If we encode 1010 on to a QFT and then measure it we will get random values since the qubits have been put in to superposition and the values we encoded in to the computational basis are now encoded in the Hadamard basis of each qubit via the controlled U1 gates.
Inverse Quantum Fourier Transform
To get our values back we can use the inverse QFT. This reverses all the rotations done in the QFT above.
For example is there was a rotation of Pi in the QFT then the inverse QFT will do a rotation of -Pi.
In Qiskit we can get the values back by implementing adding two QFTs in succession like so:
Device used
This tutorial uses the Qiskit Aer simulator in order to run the circuit. Note that results from this simulator contain no errors unlike on real quantum devices which are prone to noise.
More information on Qiskit Aer can be found here: https://qiskit.github.io/qiskit-aer/tutorials/1_aersimulator.html
In order to use to a real quantum device follow the steps here: https://quantum.cloud.ibm.com/docs/en/guides/initialize-account
Note: This program requires that you have an API token. To get one sign up to IBM Q Experience and get your token here: https://quantum-computing.ibm.com/account
Code
Output
Here is the output when running the QFT:

Output when running the 5 qubit QFT. Notice how we get multiple values back since the qubits are in superposition and the value is encoded in the Hadamard basis.
Here is the output when running the QFT with the inverse QFT.

Here the output when running the QFT with the inverse QFT. Notice how we get the 1010 back!